

Configuring DHCP Option 43 on a MikroTik Routerboard
Building my own knowledge base, i wanted to share another post, this time configuring a Mikrotik 1100 AH Routerboard as a DHCP server with option 43 (VSI).
The goal is that Ruckus access points located in a different subnet than the vSZ, SmartZone or ZoneDirector are able to discover the controller by its IP address (returned from a DHCP server) without any additional input from the installer.
There are 5 ways a Ruckus AP can discover a controller:
- The controllers' IP is stored in memory from a previous discovery.
- The controllers' IP is manually configured into the AP using the GUI or CLI.
- The controllers' IP is returned from a DNS query.
- The controllers 'IP is discovered by Layer 2 broadcast (same subnet)
- The controllers' IP is returned in a DHCP Offer (Option 43).
We will focus on the fifth method in the rest of this post.
Note 1*: Option 60 (VCI) is not configured in this demo and therefore all devices in the same subnet will receive a DHCP offer including Option 43, this can trigger a possible security issue.
Below a diagram of my LAB set-up:
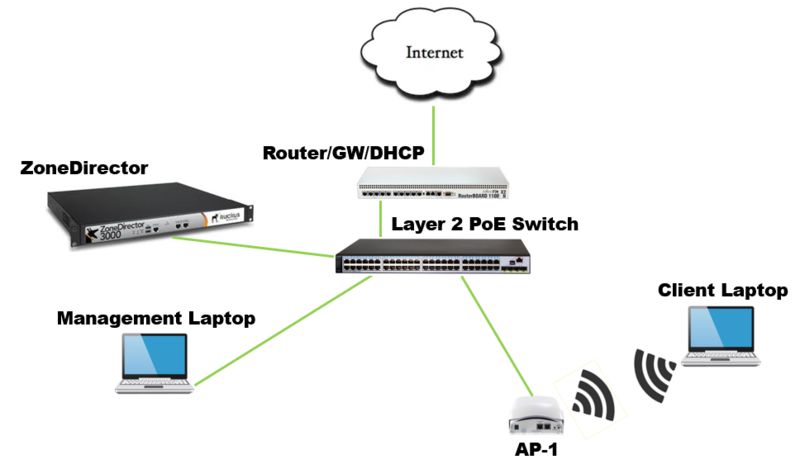
Zonedirector IP: 10.5.1.5/24 (Vlan 51)
AP-1 IP Subnet: 10.5.2.0/24 (Vlan 52)
DHCP pool: 10.5.2.100 - 110
Note 2*: I am using Winbox for the config and assume that you already have the Mikrotik Router and Zonedirector up and running and the switchports configured for the appropriate VLANs.
Below the guided steps:
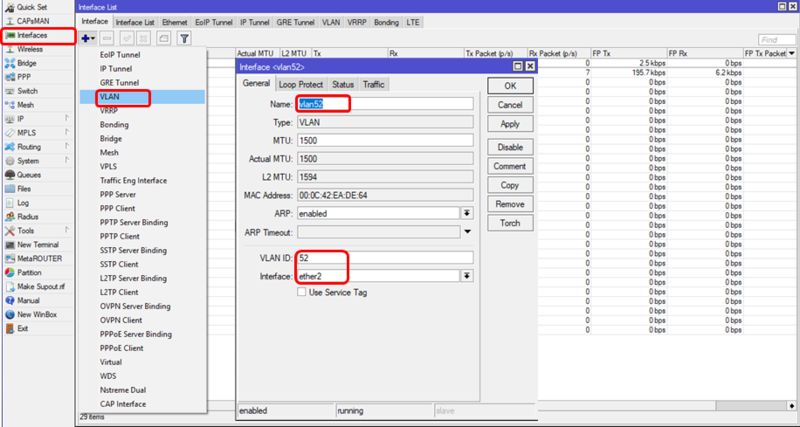
Step 1: Create a VLAN on the Physical interface of the router.
- Click on Interfaces, then VLAN. Fill in the VLAN name, VLAN ID (must be the same ID as configured on the switch) and choose the physical interface to append it to. Click "Apply" and then "OK" to close the window.
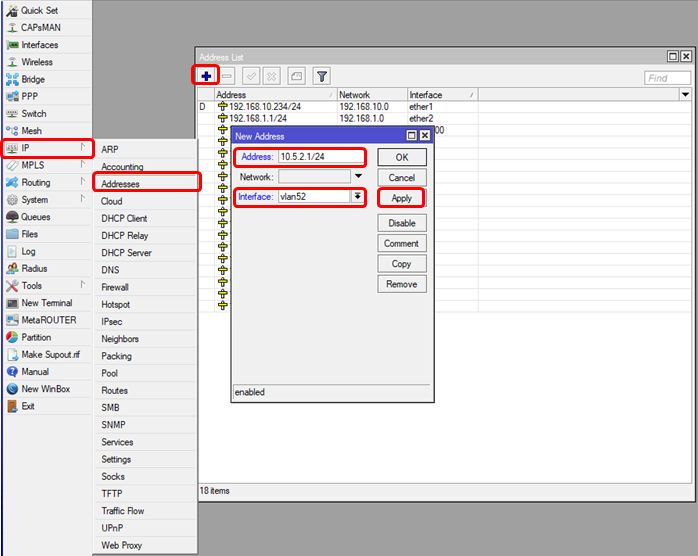
Step 2: Add an IP Address in the IP range that you will be serving DHCP.
- Click on IP, then Addresses and next the "+" sign. Fill in the router IP (interface) for the appropriate VLAN (subnet), don't worry, the Mikrotik is smart enough to find out the Network (10.5.2.0 in our case). Don't forget to click "Apply" and then "OK".
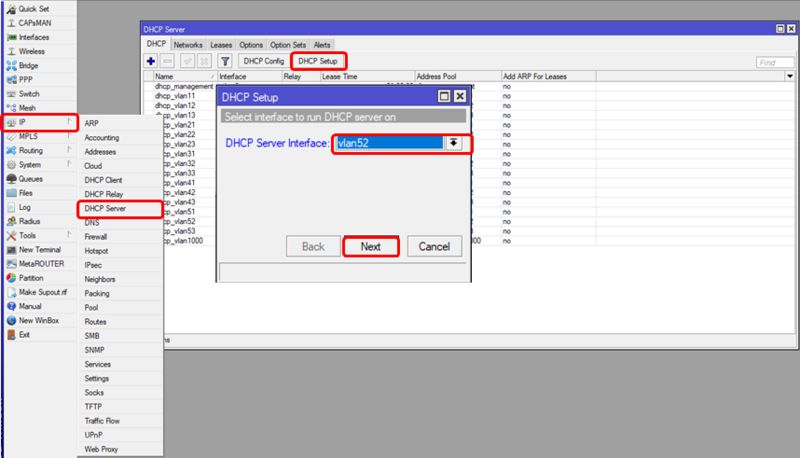
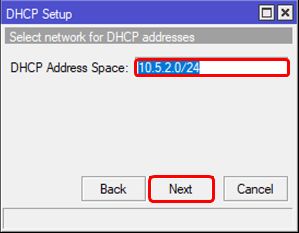
Step 3: Set-up the DHCP server.
- Click on IP, DHCP Server and then DHCP Setup. Here you need to choose the interface where you want to configure the DHCP server for (Vlan52 in our case). Click the next button to confirm.
- Fill in the subnet address for the DHCP Server and click next.
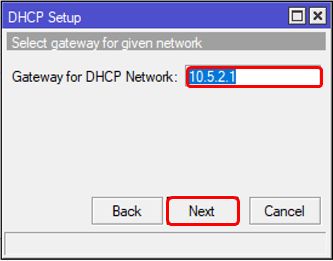
- Fill in the Gateway address (most likely the same as configured before) and click next.
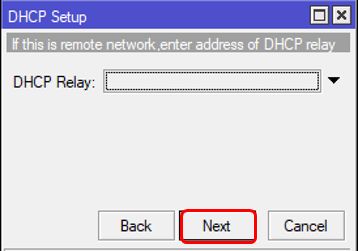
- No need to configure DHCP Relay in this case, so just click next.
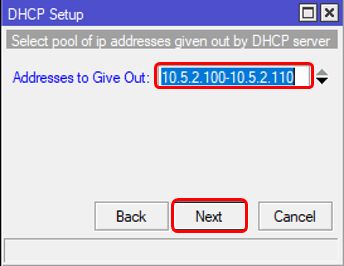
- Enter the range of IP addresses that will be issued by this DHCP server, make sure to reserve some IPs for static devices and once more click Next 🙂 .
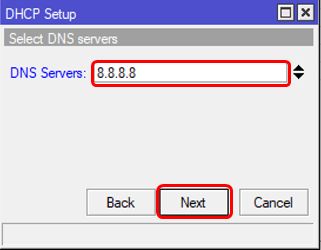
- Choose a DNS server (i chose my favorite one from Google) and click (yep, you guest it) "Next".
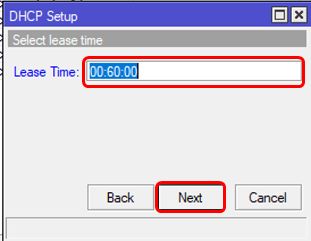
- And last but not least, choose a lease time and click "Next".
Step 4: Alright, lets have some fun now with the AP by connecting it to a switchport configured for VLAN52 and see what happens.
- Let's have a look at the current DHCP lease in the router. Nothing to see here except for my management PC. The Zonedirector has a fixed IP (10.5.1.5), so won't be showing up in here.

- Now let's connect the AP and see what happens, it received an IP address in the correct range, that's already a good start, now let's have a look at the controller.

- It should be showing up here but its not, let's have a look at the access point itself then.

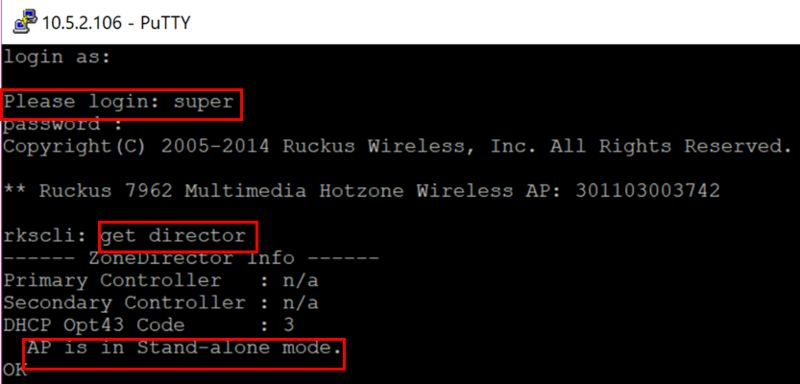
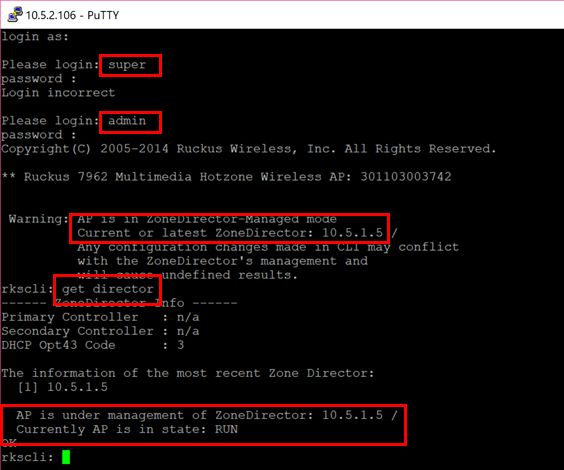
- SSHing into the AP and Hahaaa, the AP is still in Standalone Mode. The fact that i still could login into the AP with the default standalone admin password already gave me a clue.
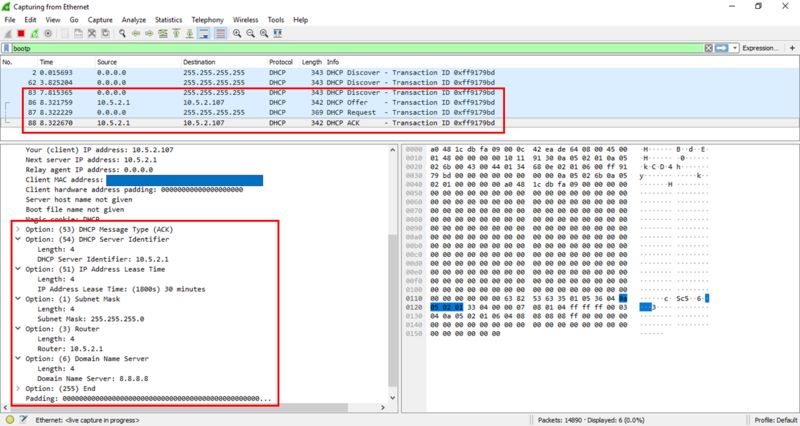
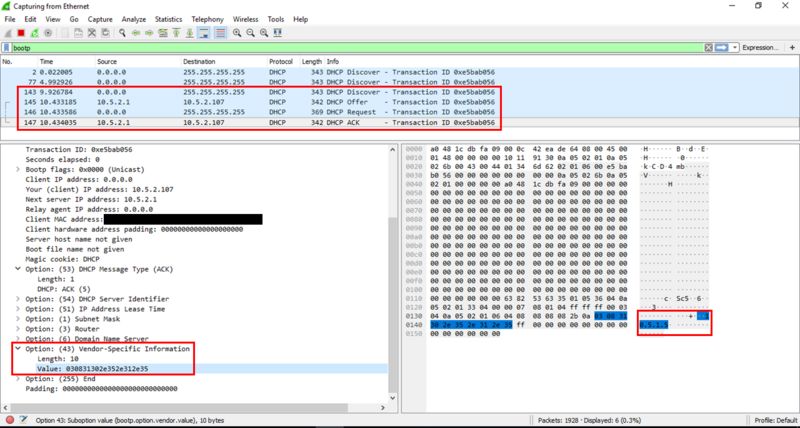
- So why is the AP not associating to the controller? Lets have a deep dive into the DHCP process (DORA). Its all there, DNS, IP address, subnetmask, gateway, Lease Time .... But of course something very important is missing here, the IP address of the controller (Option 43 VSI), how will the AP be able to find the controller if it doesn't now where to look and also all 3 other previously methods are failing?
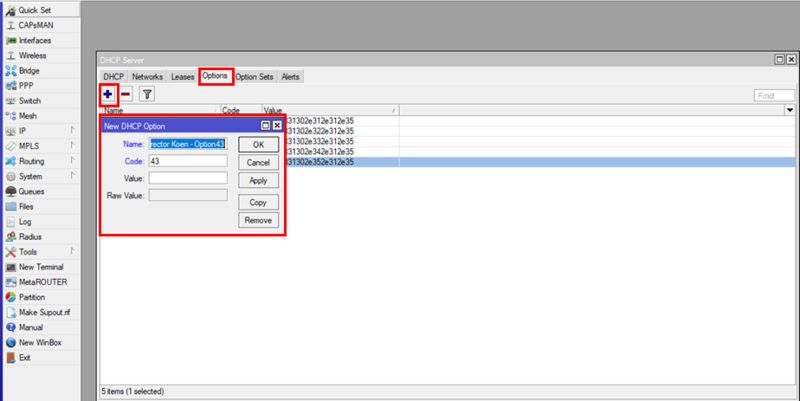
Step 5: Let's go back to our Router and configure option 43 for our DHCP Scope.
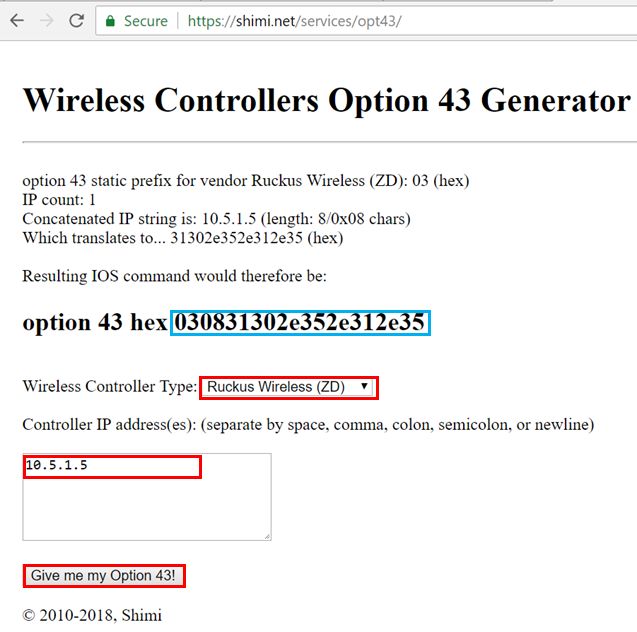
- Go back to IP >> DHCP Server >> Options and click the "+" sign. Fill in a name for the option, the code = 43 and the Value (what is that?????) It is not as simple as just providing the IP address of the controller, that would have been to easy 🙂. We will need to convert our controller's IP address into HEX format and provide that as the value, for that we need the help from a very handy site called >> https://shimi.net/services/opt43/ , lets go there now.
- The ZDs IP address in our LAB is "10.5.1.5", so let's put this into the tool in choose Ruckus Wireless (ZD) as the controller type, next click "Give me my option 43!" Copy the value with CTRL+C (marked in blue).
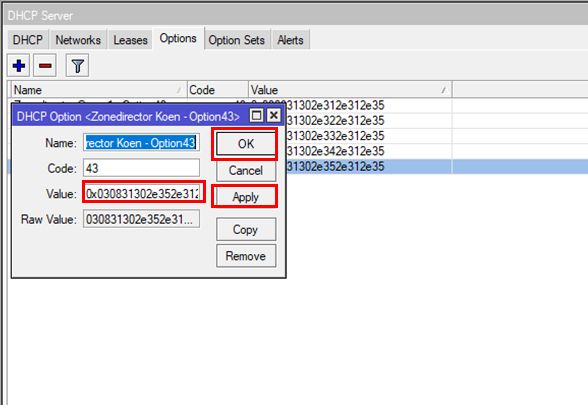
- Now copy this value into the value box but make sure to put "0x" in front of it to denote that it is an Hex value. Click Apply and then OK.
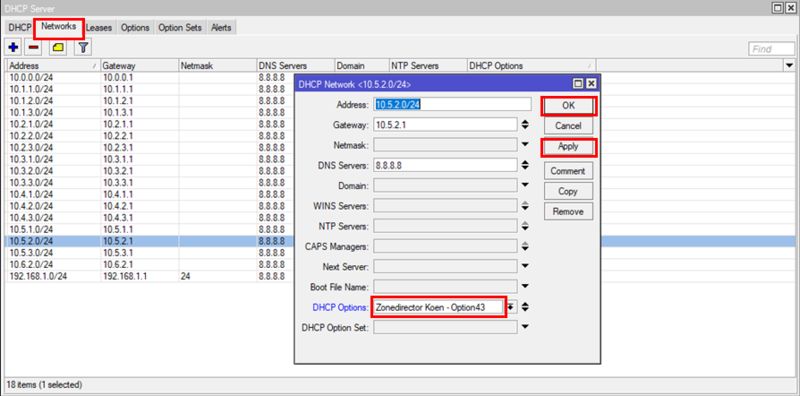
- The last thing we need to do now is bound this option we just created to our APs' subnet. Select it next to DHCP options, click "Apply" and "OK" for the last time, i promise 🙂 . That's it, great job !!!!!
Step 6: Let's try again now, shall we? Alright here we go, re-connect the AP to the switchport.
- Check the DHCP lease in the router, looks good.
- Let's have a look at the AP first. "super" is not letting me in, that's already a good sign, so use the admin account from the ZD instead (default = admin/admin). Alright, admin works and the AP is under the ZD's management and already received its config and necessary firmware updates.
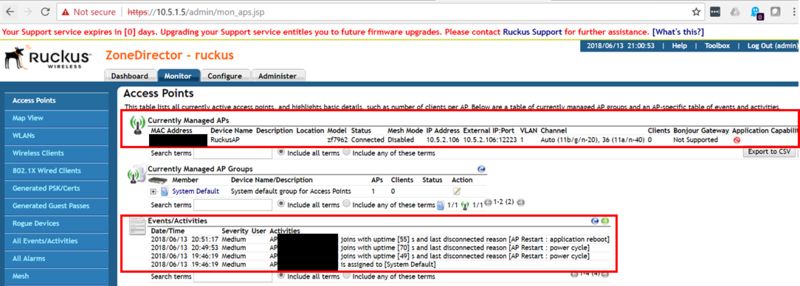
- Let's go to the ZD to verify, and there she finally is ladies and gentlemen, my beautiful half round AP in all its glory connected using LWAPP. Let's have a final look at the DHCP DORA process before we round it up.
- Alright, last bit. And here is the option i was looking for (option 43) with the ZD's IP in HEX format as well in decimal in the decode.
I hope this post will be useful and worth reading, can't wait to write my next one.
See you guys (and girls) soon and don't hesitate to comment.
-The End-
